I have been looking at the code for the CSS html slideshow, so that I can understand the code and modify the code and change it to me and my client's preference. These are the main parts of the code which create the slideshow:
At the start of the css document, there is a "@font-face" rule which allows non web safe fonts to be used. The tutorial I followed used a font called "WebSymbols", with a source font in it. The tutorial also uses "@import" to import an url of fonts, from google, which will result in a font that isn't installed on the computer to be used.

The code which applies to "Slideshow-wrap", is used for everything in the css slideshow. In this section, it generally customizes the wrapper, and the size of the box. 'display: block' allows this css to be on its on separate line, so it won't be placed on the same line as another part of the website (for example, the navigation bar, which would cluster the website, rendering it impractical and not functional. The height is set as 320px, with the minimum/maximum width set as 260 to 640 px, depending on the monitor/resolution of the user. The margin is also flexible in case of the user, allowing the browser to calculate it. The border used is a 12px solid black border.There is also a 'box-shadow' added, with '-website-' and '-moz-' used so that the 'box-shadow' will apply to every browser. 'Position' is set to relative, so it can be set at relatively the same as its normal position. However, the 'margin-top' has to be set at 20px since there is a need of a gap between the navigation bar and the css slideshow. 'z-index' is set at 1, so that this falls behind everything in terms of front to back positioning order.

In the this section of the css code, it excludes the buttons of the slideshow to only include the pictures. This <div> section is set ot fill 100% of the space given for width and height, and the 'background-color' is set to black, so if the picture source isn't found, it will change the background to black. overflow is hidden so that only the selected picture is shown, and the other pictures in the slider that aren't selected won't be shown.
In the <ul> section of the 'slideshow-inner' <div>, the list-style is none therefore there won't be any bullet points. The 'width' here is set to 500%, as there are 5 pictures that need to be shown. If it were set to 100%, the 5 pictures will be squashed into the width of slideshow, therefore 500% allows the pictures to be spaced evenly, and so that only the picture selected will be shown on the page. 'Overflow: hidden' is added for extra measure, incase the pictures show in the page. I plan on removing this since I don't think this will be needed. The position is set as relative, with the left set as '0 px'. I don't think I will need this, and I also plan on removing this from the slideshow. The transition of each picture is set here, with the transition time set as 0.8 seconds. The cubic-bezier curve is used in the tutorial, so that the speed of the transititon can be varied. '
In the <li> inside the <ul>, which is contained in 'slideshow-inner', the width is set as 20% here due to the previous 500% attribute of 'width' that was set. The 20% makes sure the pictures will be placed next to each other, and they are fully functional when they flicked through on the arrows, or using the radio buttons. 'float: left' allows them to be placed next to each other. Without this, the scrolling would also not work properly.
This is what allows the radio button selection to work. 'Visibility- hidden' hides the radio button in the picture, so that it will only show on the bottom of the slideshow. I might change the z-index, since I don't think it is needed for this webpage.
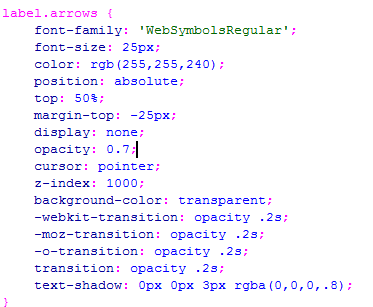
This section of css code refers to the arrows on the left/right of the slideshow. The different decorations such as opacity, opacity transition, cursor change, is included here. The display is set to 'none' in this, because the arrows are invisible, but will be revealed depending on whichever picture is currently selected.
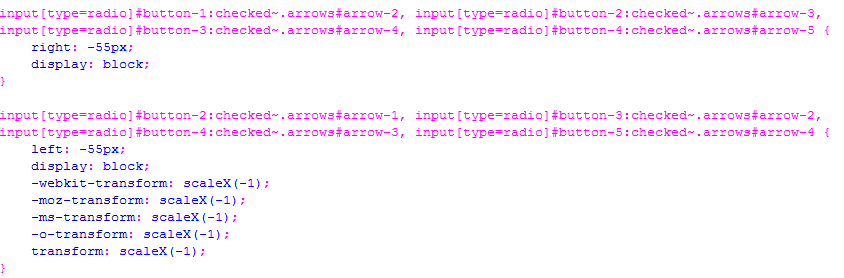
This code reveals the arrows, since it over-rides the 'none' to become 'block'. The bottom section of the code uses 'transform', since it needs to flip the '>' using "ScaleX" to flip it since the arrow will need to point the other direction for the left side.
These are the most important parts of the CSS code which creates the html slideshow. The next thing I will do, is discuss with my client on what I should do to modify the navigation bar and the css slideshow, so that it will be better suited for my client's company.


No comments:
Post a Comment